How to start setting up your Reveal instance.
Introduction
This article is a brief introduction to setting up a Reveal instance. An instance is equivalent to a single Reveal customer environment. The following sections set out use of the applications within Reveal's technology ecosystem used to complete the Reveal setup process:
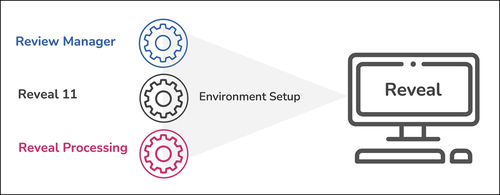
- Review Manager - A stand-alone project administration application currently used in combination with Reveal and Reveal Processing to manage all the environment and project setup functions, as well as other project admin tasks such as third-party data loading.
- Reveal - Reveal's core discovery review and analysis application. The goal is to eventually migrate the project administration functions of Review Manager and Reveal Processing into Reveal so that all project setup tasks can be performed within a single interface.
- Reveal Processing - Reveal's fast and efficient application for ingesting and preparing high volumes of data for review in Reveal.
Environment Setup Workflow
The process of setting up a Reveal instance can be summarized as follows:
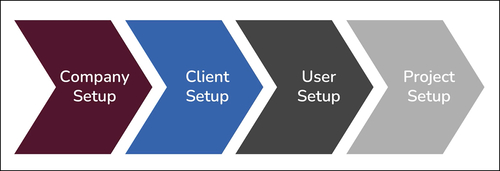
Each of these steps will be covered in greater detail below. The following diagram sets out the workflow in order, and the relationship between the steps.
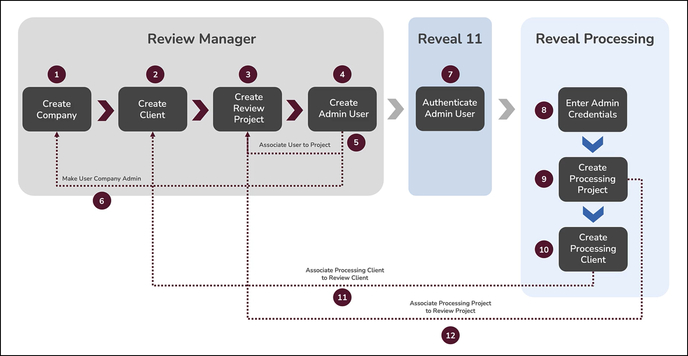
- The first step is to create a Company in Review Manager. This is a name for the instance in which all Reveal content will reside and be managed.
- A Company may have more than one Client. Clients are used to partition projects in the Company's Reveal environment when working with more than one law firm or litigation service provider.
- A Project is where case data are loaded, users and assignments are added, and review, analysis and production functions are performed. The Project is created within a Company and Client context for administration and access control.
- An Admin User must be created and assigned to administer the Company and any or all of its Projects.
- The Admin User (and there may be more than one created) is assigned to a Project to configure its components, load data, add users, tags, profiles and other settings.
- The Admin User is then designated as the Company Admin to provide integrated management with Reveal and Reveal Processing.
- Log in to Reveal as the Admin User to authenticate this user and begin to configure the Project.
- Log in to Reveal Processing to enter the Admin User credentials.
- Create a Project in Reveal Processing with the same name as the Reveal Project.
- Create a Client in Reveal Processing with the same name as the Reveal Client.
- In creating the Reveal Processing Client associate it with the Reveal Review Client.
- In creating the Reveal Processing Project associate it with the Reveal Review Project.
We will now examine these steps in greater detail.
Review Manager Setup
Review Manager begins with a section called Instance Setup where Companies, Clients and Projects are created. Further configuration and actions may then be undertaken in the Project Setup, Import, Create, Reports and Advanced Options sections. Start by logging in to Review Manager.
Company Setup
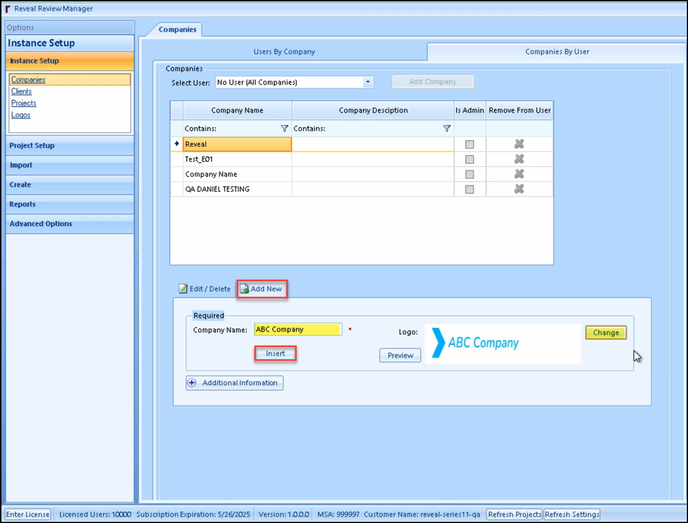
- Expand Instance Setup.
- Select Companies. Any previously-created companies will be listed.
- Select the Add New tab in the lower section of the screen.
- Enter a unique Company Name.
- You may optional add a company Logo by clicking Change to select a logo from the file system; you may add a new logo to the file system under Instance Setup > Logos.
- Optional Additional Information offers the addition of company location and contact information.
- Click Insert to complete Company setup.
- Once created, any part of the Company information may be changed, including the Company Name, under Edit / Delete. Click Update to set Company editing changes.
Client Setup
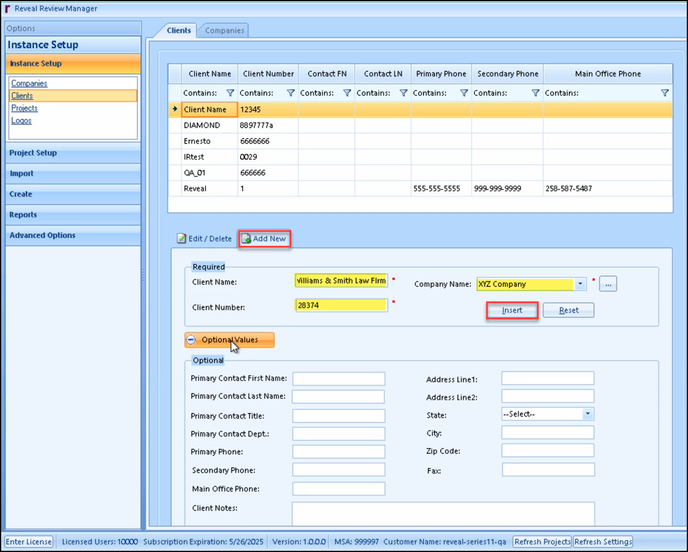
- Select Clients. Any previously-created clients will be listed.
- Select the New tab in the lower section of the screen.
- Enter a unique Client Name.
- Enter a unique Client Number, which may be part of a Company's numbering scheme used to manage multiple Clients.
- Select the Company Name under which the Client will be created.
- You may add Optional Values of client location and contact information.
- Click Insert to complete Client setup.
- Once created, Client information except for Client Number may be changed under Edit / Delete. Click Update to set Client editing changes.
Project Setup
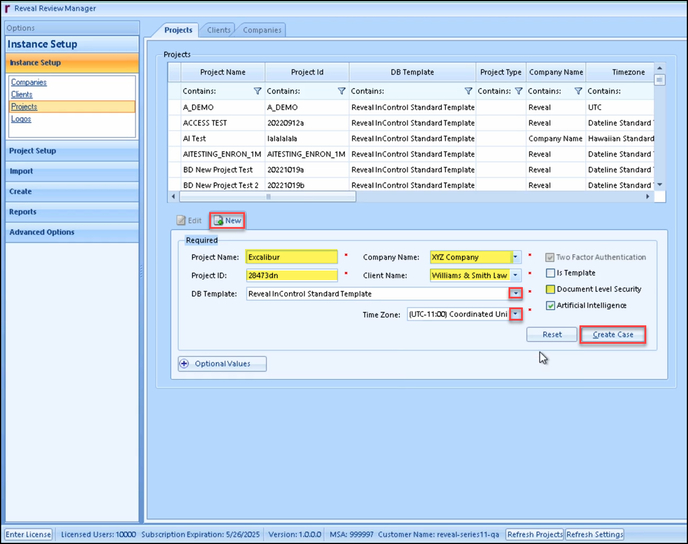
- Select Projects. Any previously-created projects will be listed.
- Select the New tab in the lower section of the screen.
- Enter a unique Project Name.
- Enter a unique Project ID, a numbering schedule used to track or differentiate projects.
- Select the Company Name under which the Project will be created.
- Select the Client Name under which the Project will be created.
- Select a DB Template containing previously-configured settings.
- There is an option in the Project New and Edit screens to select Is Template, which would make the current project settings a template for other projects.
- This will be discussed further under Templates below.
- Select the Time Zone to be used in the Project.
- Two Factor Authentication is standard, and Artificial Intelligence is selected by default. In addition to Is Template mentioned above, you may select Document Level Security to provide granular reviewer access to specified documents or classes of documents.
- You may add Optional Values of contact information.
- Click Create Case to complete Project setup.
- Certain Project settings may be modified under the Edit tab: Project Name, Company Name, Is Template, Document Level Security, Artificial Intelligence. The other fields are locked once created.
- Click Update Project to set changes.
User Setup
Creating the Admin User designates a Reveal user given responsibility for the environment's setup and maintenance. More than one Company or Project Admin User may be created. Once an Admin User logs in to Reveal, additional users of all type may be created in the Company Admin section there.
Note that in Review Manager, every screen screen opened remain available in a tab at the top of the window.
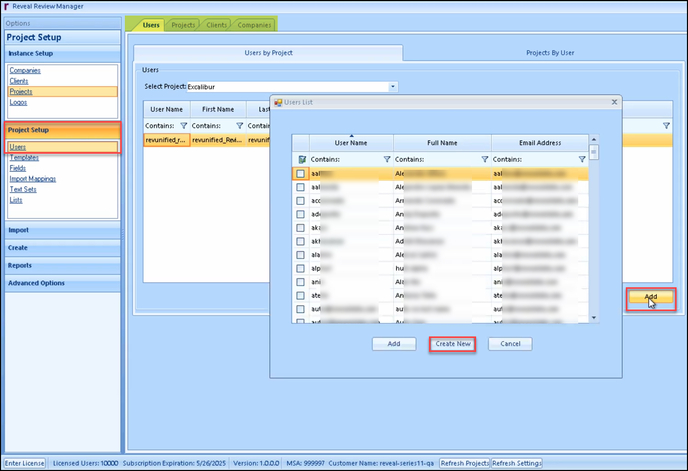
- Expand Project Setup.
- Select Users. There are two sub-tabs in this screen:
- Users by Project will open to the currently-active (just created) Project. There would only be a default Reveal administrator account listed under a new Project; eventually, all users active in a Project would be listed here.
- Projects by User will show all Projects available to the currently-selected User.
- Click Add at the lower right corner of Users by Project.
- The User List screen will open, listing any Users previously created within the Company.
- Click Create User.
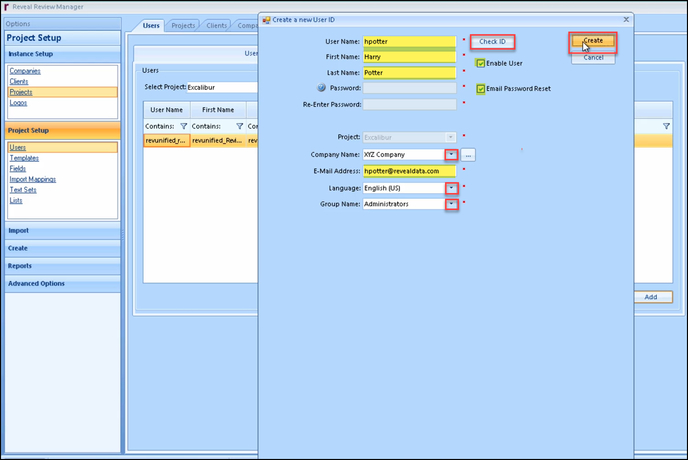
- Enter the User Name, which may be based upon the user's email address to the left of the @domain. Click Check ID to confirm that the User Name is unique and open the remainder of the fields for update.
- Enter the First Name and Last Name of the User.
- Check Enable User and Email Password Reset.
- Select the Company Name with which the User is associated. (Note that the Project is pre-selected.)
- Enter the User's E-Mail Address.
- Select the User's primary Language.
- Select the User's default Group Name; for a Company and Project Admin, that will be Administrators.
- Click Create to complete the creation of this user.
- Returned now to the User List, select the newly-created User and click Add to add this user to the Project.
%20-%20step%203.png?quality=high&width=688&height=521&name=32%20-%2009%20-%20Create%20User%20(is%20Admin)%20-%20step%203.png)
- To make this new User a Company Admin, return to the Instance Setup tab and select Companies (or select Companies tab at the top of the action window).
- Select the new Company under which you have created the new User in the Users by Company sub-tab.
- Check Is Admin in the User's record.
Templates
Any part of Project's configuration and settings may be designated as a template available to be applied to any other projects. A template may also be created from scratch by creating a new Project named as a template and designated Is Template in order to configure the desired settings in Reveal.
- To share a Project's settings as a template, open Instance Setup > Projects.
- Select the Project.
- In Edit for the Project, check Is Template.
- Click Update Project.
To apply a template to a Project:
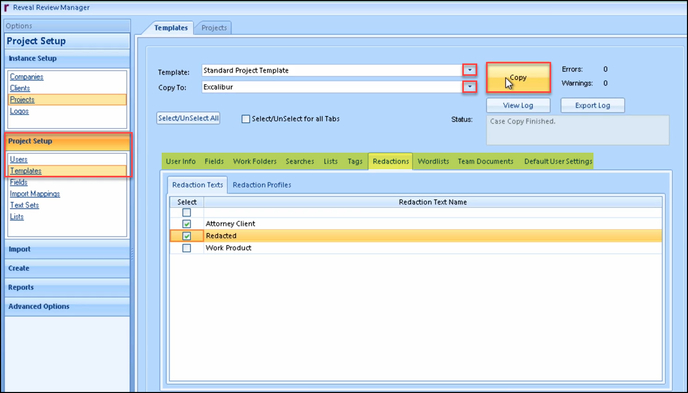
- Open Project Setup > Templates.
- Select the Template to be used from the drop-down list.
- Select the Project to which the selected Template settings will be copied.
- Under the tabs below, select the items to be copied to the Project; unless you choose to Select/UnSelect for all Tabs, you can make individual selections for the following:
- User Info
- Fields
- Work Folders
- Searches
- Lists
- Tags
- Redactions
- Wordlists
- Team Documents
- Default User Settings
- When all desired items have been selected, click Copy.
Reveal Setup
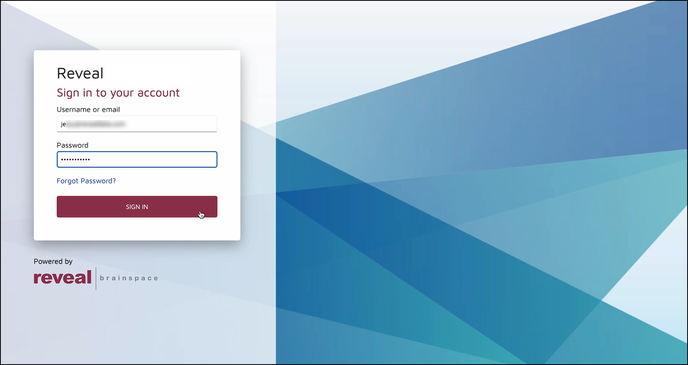
The next step in the workflow is to authenticate the new Company Admin account in Reveal. This step, which is simply a login of the Company Admin account to Reveal and opening the newly-created Project, is a prerequisite to linking the Reveal Processing Project to the Reveal Review Project.
Reveal Processing Setup
The final steps in configuring the Reveal environment take place in Reveal Processing.
- Log in to Reveal Processing.
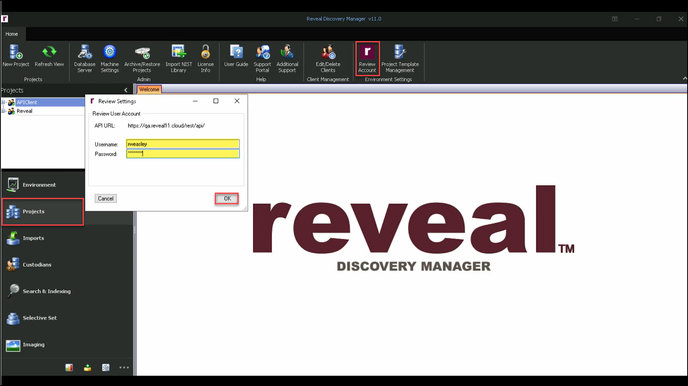
- Open the Projects panel at left.
- Open Review Account from the Projects Toolbar.
- Enter the Review Admin account Username and Password.
- Click OK to link the Processing and Review environments.
- Next, set up the Client and Project links to Review.
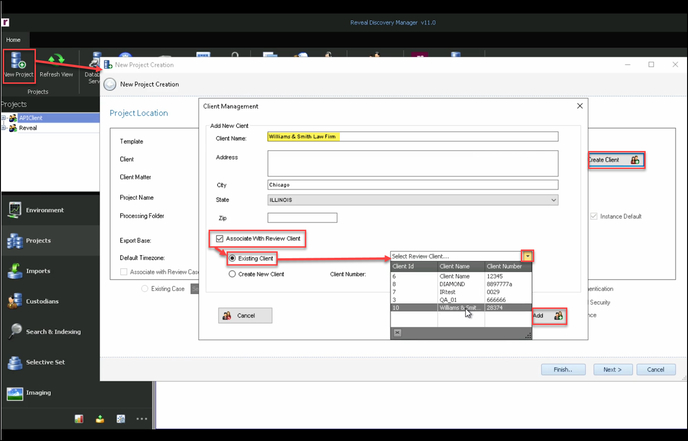
- Click New Project.
- In the New Project Creation window, click Create Client.
- Enter the Client Name which may but need not match the Client Name in Review Manager.
- Enter any optional location information desired.
- Check Associate With Review Client.
- Select Existing Client, and then select the Review Client from the list.
- Click Add to save and link the Processing and Review Clients.
- Enter the rest of the information required for New Project Creation:
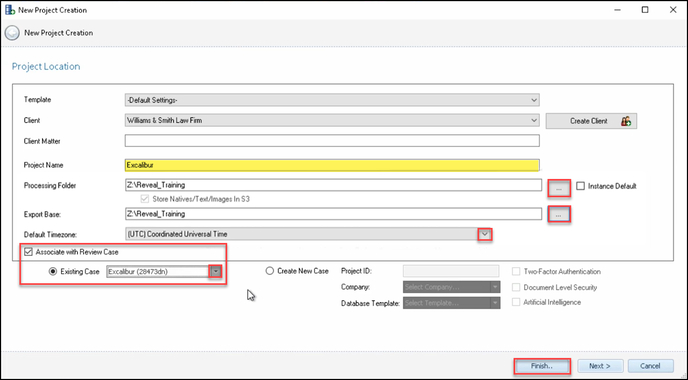
- Select a Template for Processing if different from Default Settings.
- Optionally enter a Client Matter number, often used in billing and record keeping for clients with multiple active matters.
- Enter the Project Name, which should match the Review Project Name.
- Select a Processing Folder as a root for datasets to be ingested. The Export Base will automatically use the same root setting.
- Select the Default Timezone for the project, which may be different from that specified in Review Manager.
- Check Associate with Review Case.
- Select Existing Case, and then select the Review Project from the list.
- Click Finish to save and link the Processing and Review Projects. You may also click Next to specify further Processing Project configuration options.
Your Reveal Environment is now set up and ready for data and AI-enhanced review.
Last Updated 10/26/2023
