This article provides both visual and written instructions for setting up a new company. Reveal requires a company to be associated with each project.
Non-Audio Video Tutorial
A Company is required to create a new project. Creating a Company must be done in Review Manager; managing a Company can be done either in Review Manager or in the Reveal 11 under Company Admin > Companies.
We will review creating a company in Review Manager, then managing the company under Companies in the Web user interface.
Creating a Company in Review Manager
- Log into Review Manager as an Administrator.
- Open the Instance Setup Pane.
- Click Companies.
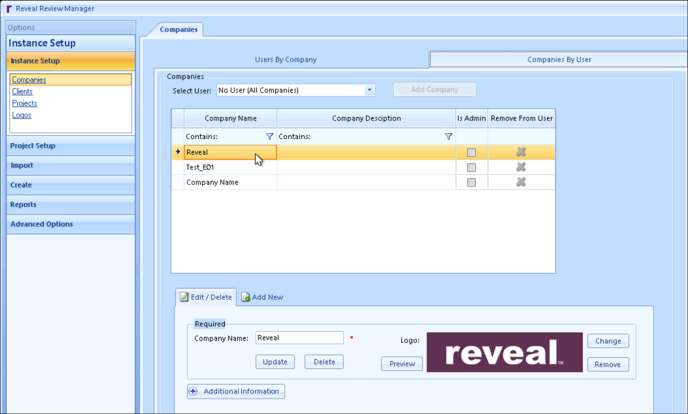
- The Companies tab appears in the work area. All existing Companies are listed in the top window.
- All Users are created under the Company, so there are sub-tabs under Companies to view Users By Company or Companies By User. In the illustration below showing the sub-tab Companies By User the Select User field is set display all companies with the selection No User (All Companies).
.png?quality=high&width=655&name=62%20-%2000%20-%20Companies%20Review%20Manager%20screen%20(Add%20New).png)
- The Add New tab is the default tab, with only the minimum required field of Company Name showing.
-
You may optionally Upload a Logo for the company and preview it. All uploaded Logos are listed under the Logos menu link under the Instance Setup pane.
-
Choose the Additional Information button to fill out additional contact details if desired.
-
Choose Insert to complete the Company creation.
-
- To Edit a company here, make any edits to the desired fields and choose Update to complete the changes.

Managing a Company under Company Admin
Companies under Company Admin more closely integrates the sub-categories of a company instance for ease of management under the Web interface. 
- Log in to Reveal as an Administrator.
- Click Company Admin in the Project Hub.
- If you are already logged in to a project, select Company Admin from the Navigation pane at the left of the main project screen.
- Company Admin will open to the Companies screen, listing current Company instances.

-
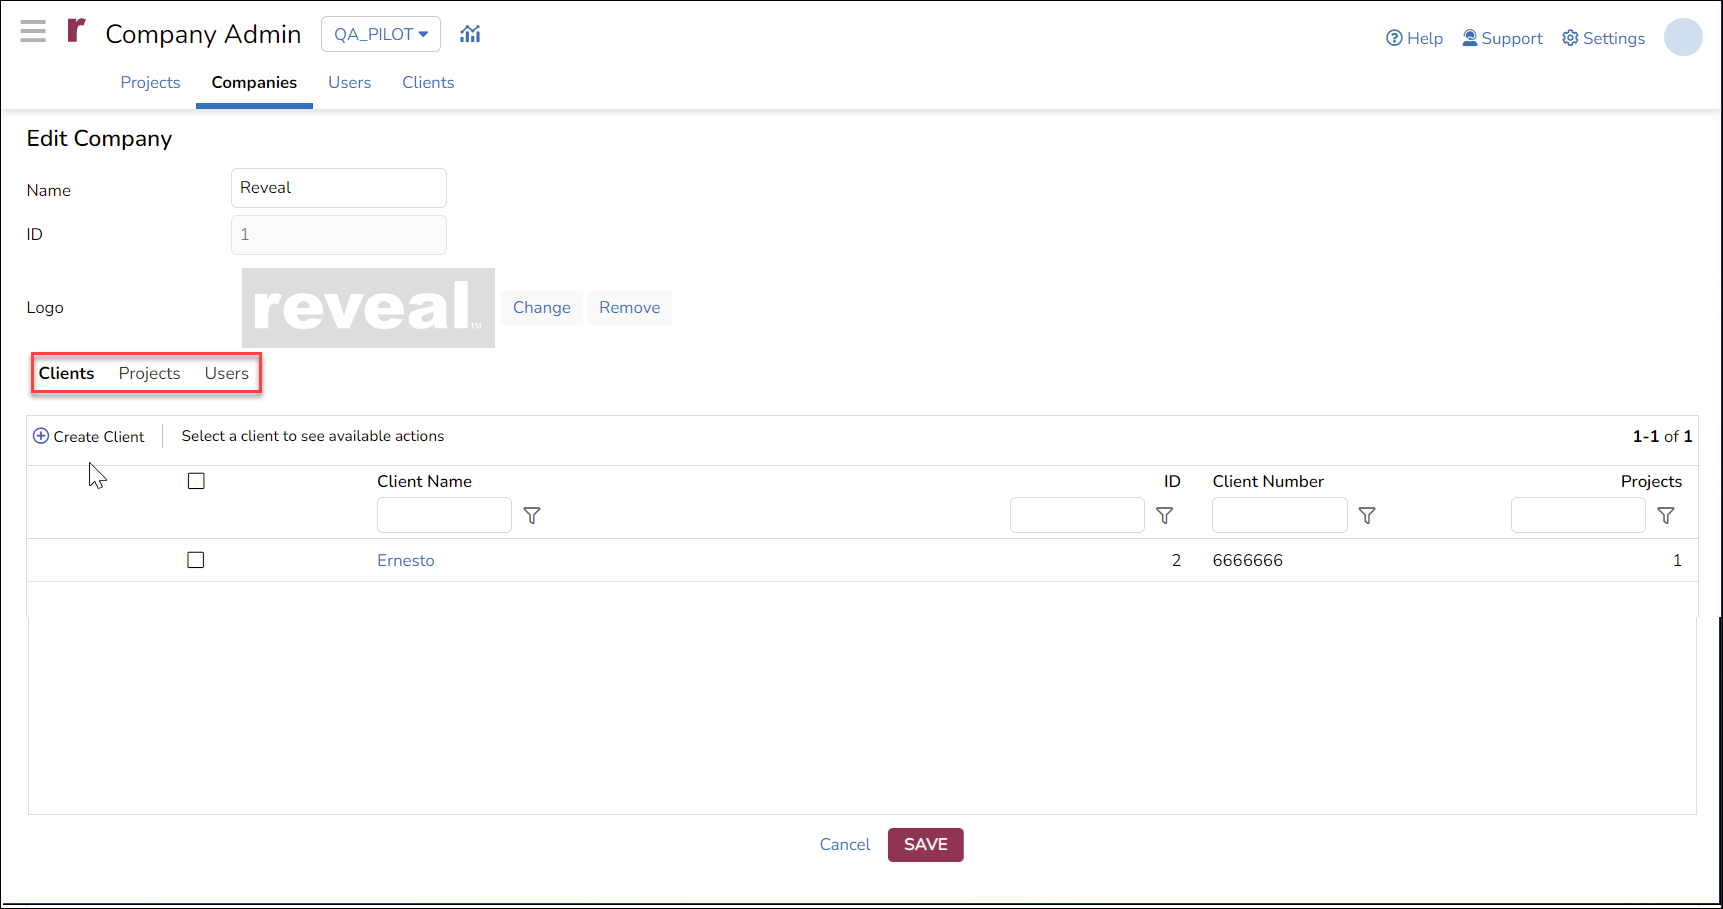
On opening the company link administrators may modify the company's name and logo.
-
This screen presents a three-tabbed table so that an administrator can also modify or create Clients, Projects and Users on this page.
Clients
The first tab, Clients, lists all clients of the company. Additional Clients may be added to this instance of Reveal. The required pieces of information to create a client are
(1) Client Name,
(2) Client Number, and
(3) Client Company,
selected from a picklist. Once created, these values cannot be changed. There are fields below for client address and contact information, as well as Client Notes. The screen focus changes to the Clients tab after creating or editing a client. See How to Create a Client for more information.
The second tab, Projects, lists all projects for the company and its clients for viewing and modification. Opening a Project shows a statistics pane on the right (below the Edit button, where users are assigned, security set and artificial intelligence enabled for the project) and a user list (from which users may be selected for removal). See How to Create a Project for more information. The screen focus changes to the Projects tab after creating or editing a project.
The third tab, Users, lists all users, active and inactive, configured under the Company. Clicking on any User record enables viewing and editing of the User account and assignments. See How to Manage Users for more information. The screen focus changes to the Users tab after creating or editing a user.
See Companies for details on setting up a Company under Reveal Review Manager.
Last Updated 6/28/2023
